Soldering Switches is a fundamental yet critical process in electronics manufacturing and repair, creating robust electrical and mechanical connections for components ranging from keyboard keys to power switches. This comprehensive guide explores best practices, common applications, and how to achieve flawless results, whether you’re working on a vintage computer or a custom mechanical keyboard.
At BEST Technology, we specialize in delivering precision-engineered metal dome components and soldering solutions for a global clientele. With decades of experience in producing high-quality metal domes and providing full-turnkey PCB assembly services—from prototyping to mass production—we combine superior materials with expert craftsmanship to ensure your products offer unmatched reliability and performance. For inquiries, pls feel free to contact us at sales@metal-domes.com.

What is Soldering Switches?
Soldering switches refers to the process of permanently attaching an electrical switch to a printed circuit board (PCB) or other substrate using molten solder.
This creates a solid electrical path and a firm mechanical bond. A proper soldering switches job is vital for the longevity and functionality of countless devices, from consumer electronics to industrial controls.
The quality of this process directly impacts electrical conductivity, switch stability, and the overall durability of the final product.
Soldering Switches to PCB: Common Mistakes
The process of soldering switches to PCB seems straightforward but is prone to several errors that can compromise the entire assembly. Awareness of these pitfalls is the first step toward avoidance.
- Insufficient or Excessive Heat: Applying too little heat from your iron can result in a “cold solder joint”—a dull, grainy connection that is weak and prone to failure. Conversely, excessive heat can damage the switch’s internal plastic components, lift the copper pad from the PCB, or damage adjacent components.
- Over- or Under-Applying Solder: Too little solder creates a weak, intermittent connection. Too much solder can lead to blobs that risk short-circuiting adjacent traces or pins. The goal is a concave, shiny fillet that smoothly wets both the pin and the pad.
- Poor Flux Management: Flux is essential for cleaning the surfaces and promoting good solder flow. Not using flux or using the wrong type can lead to poor wetting and weak joints. Failure to clean corrosive flux residues after soldering can lead to long-term corrosion.
- Physical Misalignment: This is especially critical for soldered keyboard switches. Failing to ensure all switches are perfectly seated and straight before soldering will result in a crooked, uneven keyboard that is difficult or impossible to correct later.
How to Properly Perform Soldering Switches on a PCB?
Achieving superb quality in your soldering switches work requires the right tools, technique, and patience. This guide applies to a wide range of applications, from soldering Nintendo Switch joy-con connectors to soldering mouse switch components.
- Preparation is Key: Gather your tools: a temperature-controlled soldering iron, fine-gauge leaded or lead-free solder, flux, a soldering stand, and brass wool for tip cleaning. Ensure the PCB and switch pins are clean.
- Insert and Secure the Switch: Place the switch into the correct PCB holes, ensuring it sits flush and is oriented correctly. For soldering keyboard switches, use a plate or a piece of tape to hold them all in place.
- Apply Heat and Solder Correctly: Set your iron to an appropriate temperature (typically 600-700°F or 315-370°C). Touch the tip of the iron to the component lead and the PCB pad simultaneously to heat both. After 1-2 seconds, feed the solder wire into the junction—not directly onto the iron. The solder should flow smoothly and create a shiny, volcano-shaped joint.
- Inspect the Joint: A good solder joint should be bright, shiny, and concave, smoothly covering the pad and lead. Dull, lumpy, or blobby joints indicate a problem and should be reworked.
Tips for Soldering Keyboard Switches Without Damaging the Board
Soldering keyboard switches requires extra care to preserve the delicate PCB. The goal is a perfect electrical connection without thermal damage.
- Use a Temperature-Controlled Iron: An unregulated iron, like an old Weller soldering gun switch, can get too hot. A modern, temperature-controlled iron is far safer.
- Work Quickly and Methodically: Apply heat only for as long as necessary to create a good joint. Prolonged heat can delaminate the thin copper traces on the keyboard PCB. Move between pins to allow areas to cool down.
- Consider an Automatic Soldering Iron Switch: Some modern irons feature an automatic soldering iron switch or sleep function to prevent overheating when idle, adding a layer of safety.
Best Practices for Soldering Micro Switches in Electronics
Soldering micro switches, commonly found in arcade controls, appliances, and automotive applications, follows the same core principles but demands a finer touch due to their small size and densely packed pins.
- Use a Fine Tip: A sharp, conical or chisel tip provides better precision and heat control for the small solder pads.
- Apply Flux Sparingly: A small amount of liquid or paste flux will ensure the solder flows perfectly into the tight spaces without bridging the pins.
- Avoid Solder Bridges: After soldering, visually inspect under magnification to ensure no solder has accidentally connected two pins. Use solder wick to remove any bridges carefully.
Lube Soldered Switches for Smoother Mechanical Key Feel
For enthusiasts seeking the perfect typing experience, the process of lubing soldered switches can dramatically improve smoothness and reduce noise. However, lubing soldered switches must be done with care, as it typically requires desoldering the switches first.
- Purpose: Lubricant is applied to the slider stem and spring of a mechanical keyboard switch to minimize metal-on-plastic friction and spring ping.
- Process: Since most lubrication needs to be applied internally, soldered keyboard switches must be carefully desoldered and removed from the PCB to be disassembled and lubricated. This highlights a key consideration when building a keyboard: if you plan to experiment with lubrication, a hot-swap socket (like those compared to Outemu hot swap socket vs soldered) allows for tool-free switch removal, unlike soldered switches.
Should C64 power Switch be Soldered on Both Sides?
This is a common question among vintage computing enthusiasts restoring a Commodore 64. The C64 power switch, like many through-hole components, is designed to be soldered on both sides of the PCB for maximum mechanical strength and electrical reliability.
- Mechanical Stability: The pins of the switch pass through the PCB. Soldering them on both the top and bottom sides anchors the component firmly, preventing it from becoming loose due to repeated physical toggling. A switch that is only soldered on one side is more susceptible to breaking off over time.
- Electrical Integrity: A full, proper solder joint on both sides ensures a low-resistance connection. This is crucial for a power switch, which may carry significant current. A weak or cold solder joint on one side could lead to increased resistance, voltage drop, heat generation, and eventual failure.
In summary, for a critical component like the C64 power switch, soldering on both sides is not only recommended but essential for a safe, reliable, and long-lasting repair.
Why Choose Best Technology for High-Quality Soldering Switches?
When your project demands reliability, partnering with an expert manufacturer is crucial. BEST Technology provides end-to-end solutions for all your switch-related needs.
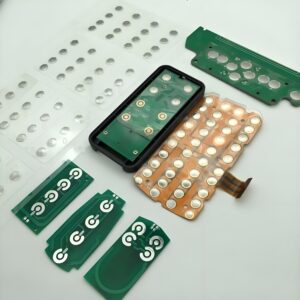
- Premium Metal Domes and Switch Pads: We are a leading manufacturer of custom metal domes, which provide the tactile feedback in myriad switches. Our domes offer exceptional stability, a consistent tactile feel, and long life cycles, making them ideal for your soldered switch pad designs.
- Expert Soldering and PCB Assembly: Beyond components, we offer full PCB assembly services. Whether your project involves arcade control soldering switches, mechanical keyboard switch soldering, or intricate consumer devices, our skilled technicians and advanced SMT lines ensure perfect results every time. We support everything from small-batch prototypes to high-volume production.
- Commitment to Quality: From the initial design review to the final inspection, we are committed to delivering the superb quality soldering solutions that modern electronics applications demand.
In summary, soldering switches is a critical skill that ensures the durability and performance of electronic devices, from custom keyboards to industrial controls. This article has outlined the key techniques, common mistakes, and best practices to achieve professional-grade results for various applications, including soldering Nintendo Switch components and soldering micro switches.
BEST Technology provides not only top-tier components like metal domes and switch pads but also comprehensive manufacturing and assembly services to bring your most demanding designs to life with precision and reliability. Please feel free to reach out to our team via sales@metal-domes.com to discuss your requirements.